
DIY Solar Storage Fundamentals
Understanding battery chemistries for DIY projects
South Africa’s sunshine is a lazy gold mine for home energy, and that makes DIY solar storage a tempting sideline. When you start with the basics of battery chemistries, you’re not chasing hype—you’re choosing a foundation for solar battery diy.
Understanding how these chemistries behave helps you avoid drama with your inverter and your fuse box. Common options include:
- Lead-acid
- LiFePO4
- Nickel-based chemistries
Each has its quirks—lead-acid loves cheap price and patience, LiFePO4 stays cool in SA heat, while nickel options brag about compactness and faster charging, yet demand careful management and better ventilation.
Key specs to consider: voltage, capacity, and depth of discharge
Sunlight is South Africa’s quiet engine, and the numbers prove it: SA homes collect more solar energy on sunny days than many households can use. For any successful solar battery diy, understanding the basics of voltage, capacity, and depth of discharge is essential. The right balance keeps your inverter from groaning and your fuse box from throwing tantrums, turning potential drama into dependable daylight storage.
Consider these key specs as your compass:
- Voltage: the electrical pressure that equipment expects; mismatches can stress inverters and cables.
- Capacity: the total energy the bank can store, shaping how long your essentials run between charges.
- Depth of Discharge: how much you can draw before recharging, influencing cycle life and long-term performance.
These metrics keep a DIY setup honest and aligned with SA’s grid realities.
Safety basics and protective equipment
South Africa basks under some of the world’s sunniest skies, delivering up to 5.5 kWh/m2/day on peak days. That abundant light fuels a quiet revolution in homes, yet daylight storage calls for care. Solar battery diy work shines brightest when safety is the constant companion, turning bright ideas into reliable energy without unsettling the house’s rhythm. The goal is dependable daylight storage, achieved through a thoughtful, disciplined approach rather than bravado.
Safety basics center on protective gear and a calm, measured pace. Here’s the kit that makes the day safer:
- insulated rubber gloves rated for DC voltage
- face shield or safety goggles
- flame-retardant clothing or long-sleeved, non-synthetic garments
- non-slip, closed-toe footwear
- insulated, non-conductive tools
- voltage tester designed for DC circuits
- fire extinguisher appropriate for electrical fires
Beyond gear, space matters: ventilated rooms, dry hands, and a respectful pace around energized components keep the atmosphere calm and predictable.
Tools and workspace setup for battery work
South Africa’s sun is not just a backdrop—it’s a productivity accelerator for solar storage projects. When the goal is seamless daylight power, the first move is a workspace that feels almost ceremonial: clean, dry, and ordered, where every tool has its place. The term solar battery diy shifts from hobby to craft when space and mindset align, turning bright ideas into steady, quiet energy.
Set up a dry, ventilated room with a sturdy workbench and open shelving for components. Keep electricity components away from moisture and direct sun; use a non-slip mat and bright, shadow-free lighting so details stay clear. A dedicated corner, free from heavy traffic, helps maintain a calm pace around energized parts and preserves the home’s rhythm!
Common terms and acronyms explained
South Africa’s sunny days are a rallying cry for solar storage—clear skies, cleaner power, and real energy independence! In solar battery diy, you’ll encounter terms that keep discussions precise and safe. SoC and DoD levels guide how full a pack is and how much you can draw. MPPT and PWM describe charging styles, while BMS, Ah, and Wh translate capacity to real usage.
- SoC — State of Charge: how full the battery is now.
- DoD — Depth of Discharge: how much energy you’ve used.
- MPPT — Maximum Power Point Tracking: efficient solar charging.
- PWM — Pulse Width Modulation: a simpler charge controller.
- BMS — Battery Management System: protects and balances cells.
- Ah/Wh — capacity units: amp-hours and watt-hours.
These terms become handy anchors as you navigate voltage, capacity, safety in a South Africa–centric solar storage setup for solar battery diy.
Choosing Components and Sizing for DIY Systems
Calculating your energy needs and system sizing
Power outages are a daily reality in many South African neighborhoods, and a smart solar battery diy setup can keep the lights on when the grid falters. Size and components matter more than fancy specs; a balanced system pays off in reliability and long-term savings!
Choosing components means matching panels, a charge controller, an inverter, and a dependable battery bank to your home’s rhythm. For clarity, consider this core lineup:
- Solar panels sized for your location
- Charge controller (MPPT preferred)
- Inverter with adequate peak rating
- Battery bank configuration and fusing
Calculating your energy needs and system sizing means looking at daily kWh use, peak draws, and climate effects on performance. The aim is to balance availability with cost and longevity; expect to revisit assumptions as seasons change.
Selecting cells and packs: Li-ion, LiFePO4, or lead-acid options
Outages in South Africa sharpen the need for reliable power. As one installer puts it: “When the grid falters, preparedness saves more than money.” For a DIY solar setup, component choice and sizing determine long-term performance. This is solar battery diy in practice: pick a chemistry that fits your daily load, climate, and budget, then build around it.
- Li-ion (high energy density, lighter packs, faster charge)
- LiFePO4 (stable chemistry, long cycle life, safer in heat)
- Lead-acid (affordable upfront, robust, heavier and shorter cycle)
A well-sized pack pairs with a proper battery management system, fusing, and an inverter with adequate peak rating. The aim is balance: steady performance, safer operation, and lower total cost over years rather than flashy specs.
Inverter, charger, and BMS compatibility considerations
Outages in South Africa sharpen the need for reliable power, and this is where solar battery diy becomes practical. As one installer puts it: “When the grid falters, preparedness saves more than money.” For a DIY setup, the game is choosing an inverter, charger, and BMS that play nicely with your chosen pack and daily load.
Inverter choice should reflect peak draw expectations and surge capacity, not just the average. A charger’s voltage and current profile should align with the chemistry, and the BMS capabilities should include cell balancing and pack protection. Compatibility isn’t flashy, it’s the quiet engineer behind day-long performance.
Consider these compatibility checkpoints:
- Inverter peak rating relative to actual loads
- Charger voltage/current alignment with pack chemistry
- BMS communication, protection features, and fuse sizing
Enclosures, mounting, and thermal management
Power outages in South Africa can stretch for several hours a week, turning a bright day into a planning session. In a solar battery diy setup, enclosures, mounting, and thermal design aren’t afterthoughts—they’re the backbone of long, reliable performance.
Enclosure sizing interacts with pack fit, wiring routes, and ventilation. Weight, mounting orientation, and accessible cable runs influence installation in tight spaces or on a roof rack. Thermal management becomes a non-negotiable factor, with options ranging from passive ventilation to small fans triggered by temperature thresholds.
- Enclosure sizing and airflow
- Mounting hardware and vibration resistance
- Thermal management strategies and venting
A tidy layout supports durability and ease of maintenance, especially in environments where heat and dust are constants—key realities for solar battery diy systems.
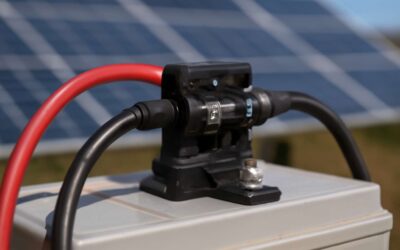
Battery management and safety features to look for
In the theatre of renewable power, choosing components and sizing for solar battery diy is the secret that keeps lights bright when the grid yawns over South Africa’s sunny days. A BMS and careful pack sizing are the hinge of reliability. A well‑matched BMS guards balance and thermal sensing as heat climbs on rooftop racks.
- Battery Management System features such as cell balancing and protections
- Temperature sensing and thermal cutoffs for safe operation
- Fusing, disconnects, and clear labeling for maintenance
Choosing components with compatibility in mind—the pack chemistry, inverter input range, and charger—ensures the signals align. Prioritize safety features such as short-circuit protection, overcurrent protection, and enclosure integrity to resist dust and heat. For solar battery diy, precision in sizing keeps expansion practical and performance steady.
Step-by-Step Assembly and Wiring
Configuring series and parallel strings for the desired voltage and capacity
Power storage isn’t magic; it’s architecture. In South Africa, homes embracing thoughtful solar battery diy configurations often see daytime usage trimmed and tariffs softened by substantial margins, making the sun pay dividends. The wiring choreography—series for voltage, parallel for capacity—decides whether a pack meets daily load curves and seasonal demand.
To thread this needle, frame the design around clear targets.
- Target voltage per string aligned with inverter and BMS specs
- Total pack capacity to meet daily energy needs
- Number of strings in parallel to achieve safe current and balance
- Cell balance, temperature limits, and fault tolerance
From concept to calm operation, plan for enclosure, connectors, and thermal management; the goal is longevity and steady performance in solar battery diy projects, delivering reliability when it matters most.
Creating clear wiring diagrams and safety disconnects
Power storage gains purpose when the wiring has a plan. In South Africa’s sun-powered homes, a solid diagram and thoughtful safety approach transform curiosity into reliable daily performance. For solar battery diy, the choreography—where strings determine voltage and parallel groups handle current—needs a clear roadmap before any metal is touched.
- Draft a wiring diagram that mirrors your series/parallel strategy and keeps terminations readable.
- Install a safety disconnect and route conductors to minimize accidental contact during maintenance.
- Plan enclosure layout with airflow and strain relief to reduce thermal stress.
- Document the plan and perform non-live checks to verify polarity, continuity, and compatibility with the inverter and BMS.
In a solar battery diy project, the diagrams in place and the disconnects ready, you’re closer to calm operation than you might expect. The aim is longevity and steady performance when the sun tests the system, not just a quick spark of progress.
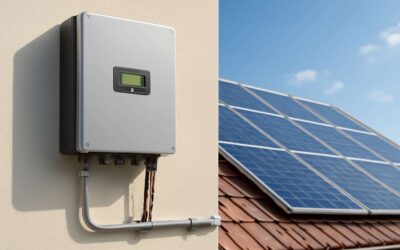
Integrating with solar panels, charge controller, and inverter
South Africa basks in sun that never seems to clock off, and a well-crafted solar battery diy becomes a quiet, dependable companion. The stagecraft is simple: align panels, controllers, and an inverter so daylight flows like a well-rehearsed chorus, not a chaotic jam session. Predictable power, finally.
In step-by-step assembly and wiring, the map shows how strings determine voltage while parallel groups carry current, then how the charger and inverter join the performance. Consider these primary components:
- Solar panels
- Charge controller
- Battery bank
- Inverter
- Battery management system
- Safety disconnects
Document the plan and perform non-live checks to verify polarity, continuity, and compatibility with the inverter and BMS. A calm operation today guards tomorrow’s reliability.
From my bench, done with the choreography, the solar battery diy becomes a steady backbone for daily loads, proving that sunshine can be punctual without drama.
Initial conditioning, balancing, and verification checks
In South Africa, five peak sun hours greet us daily, a clockwork of light that rewards careful preparation. A solar battery diy becomes more than storage—an unobtrusive partner that turns daylight into reliable power.
The plan for Step-by-Step Assembly and Wiring centers on initial conditioning, balancing, and verification checks—the trio that threads reliability through every connection. Start with core components: solar panels, charge controller, battery bank, inverter, battery management system (BMS), and safety disconnects, and map voltage and current strings.
- Inspect hardware for polarity and perform non-live continuity and polarity checks; secure fusing prior to connecting.
- Balance cells by equalizing charge across strings, paying attention to temperature and state of charge (SOC).
- Verify continuity and compatibility with the inverter and BMS; document readings and flag anomalies.
From the bench to daily loads, conditioning and verification forge a backbone that proves sunshine can stay punctual.
Safety tips during assembly and testing
Five peak sun hours greet us daily, a clockwork of light that rewards careful preparation. For solar battery diy projects, that punctual sun becomes a partner, turning daylight into dependable power. In South Africa’s rural kitchens and workshops, safety starts long before the first connection.
- Keep the workspace calm and non-live while inspecting hardware for polarity
- Label all wiring clearly and rely on non-contact indicators to confirm orientation
- Document readings and timestamps so future checks stay grounded in history
This quiet discipline ensures the journey ends with a reliable, lifelong partner for daily loads.
Testing, Maintenance, and Troubleshooting
Monitoring voltage, current, and temperature for health assessment
Testing a solar battery diy installation begins with a calm eye on the numbers. By monitoring voltage, current, and temperature, you read the battery’s pulse and its aging rhythm. A healthy pack maintains steady voltage under load, a modest current, and a gentle rise in temperature—never a spike that hints at imbalance. Record these readings at the same time each day, and let the quiet data guide your decisions. In South Africa, a sun-warmed home deserves disciplined, data-first practice.
Maintenance is ritual, not routine. Clean terminals, tighten connections, and ensure venting and cooling stay unobstructed. These checks sustain longevity and reliability.
- Voltage readings within spec
- Current draw matches expectations
- Temperature sensors stable and wiring sound
Troubleshooting highlights gaps: a sagging voltage, unusual current shifts, or a temperature anomaly. When readings stray, observe connections and sensor drift; safety still governs the process.
Estimating state of charge and battery health metrics
Testing, testing—the numbers don’t lie. In solar battery diy projects, you read the battery’s pulse by watching voltage under load, resting voltage, current, and the quiet rise of temperature. A healthy pack keeps voltage steady under load, current modest, and temperature calm—never a spike that hints at imbalance. In South Africa, a sun-warmed home deserves disciplined, data-first practice.
- Voltage readings stay within spec under load
- Current draw matches expectations
- Temperature sensors stable and wiring sound
Maintenance is ritual, not routine. Clean terminals, tighten connections, and ensure venting and cooling stay unobstructed. These checks sustain longevity and reliability.
Troubleshooting highlights gaps: a sagging voltage, unusual current shifts, or a temperature anomaly. When readings stray, observe connections and sensor drift; safety still governs the process.
Common troubleshooting steps for DIY battery banks
Testing means watching how the pack behaves under load: voltage under load, resting voltage, current, and a calm rise in temperature. For solar battery diy projects, a healthy pack keeps voltage steady when loaded, current within expected ranges, and temperature stays calm—never spiking or drifting.
Maintenance is ritual, not routine: clean terminals, tighten connections, and ensure vents and cooling stay unobstructed. Regular checks safeguard longevity and reliability, keeping the system ready for the next sunny day.
Troubleshooting highlights gaps: a sagging voltage, unusual current shifts, or a temperature anomaly. When readings stray, start with connections and sensor checks, then verify wiring layouts against your diagram and safety disconnects.
- Check all connections and tighten where needed.
- Compare readings with spec sheets and recent logs to spot drift.
- Inspect sensors and venting for obstructions; pause if anything looks unsafe.
Maintenance schedules, cycling routines, and end-of-life considerations
Testing is a compass in my solar battery diy, where a pack’s character reveals itself under load: voltage steady, resting voltage calm, current in harmony, temperature rising no faster than a sigh. The sun greets the day; I watch the pack respond with quiet assurance.
Maintenance is ritual, not routine—a seasonal cadence I honor. I sketch maintenance schedules, contemplate cycling routines that reveal the pack’s memory, and keep end-of-life considerations close as the final stanza of a long, sunlit partnership. In South Africa’s bright climate, the rhythm anchors reliability when the grid recedes and the sky opens wide.
Troubleshooting marks the brittle edge of drift: a sagging voltage, odd current whispers, or a temperature anomaly. When readings stray, I reread the diagram, I question connections and sensors, and I let the system guide me back to balance—a quiet, disciplined repair of the day.
Documentation and record-keeping practices
“Testing is the compass,” a veteran DIYer notes, and in solar battery diy practice the pack reveals its truth under load. Voltage holds, resting voltage stays calm, current sings in balance, and temperature climbs only as a quiet breath. Records become the map through the day’s sun.
Maintenance is cumulative, and record-keeping anchors reliability; a seasonal rhythm of checks and balancing ensures longevity, especially in SA’s bright climate. In my notes, I capture actions taken, parts replaced, next service date, and system responsiveness.
- Date and time of maintenance
- Component IDs and serial numbers
- Voltage, current, temperature at test points
- Actions performed and equipment used
When faults appear—sagging voltage, odd current whispers, or heat spikes—my logs turn noise into narrative, guiding diagnosis and restoration. A clear trail supports warranty, future upgrades, and the long arc of a partnership.

0 Comments